Pin It
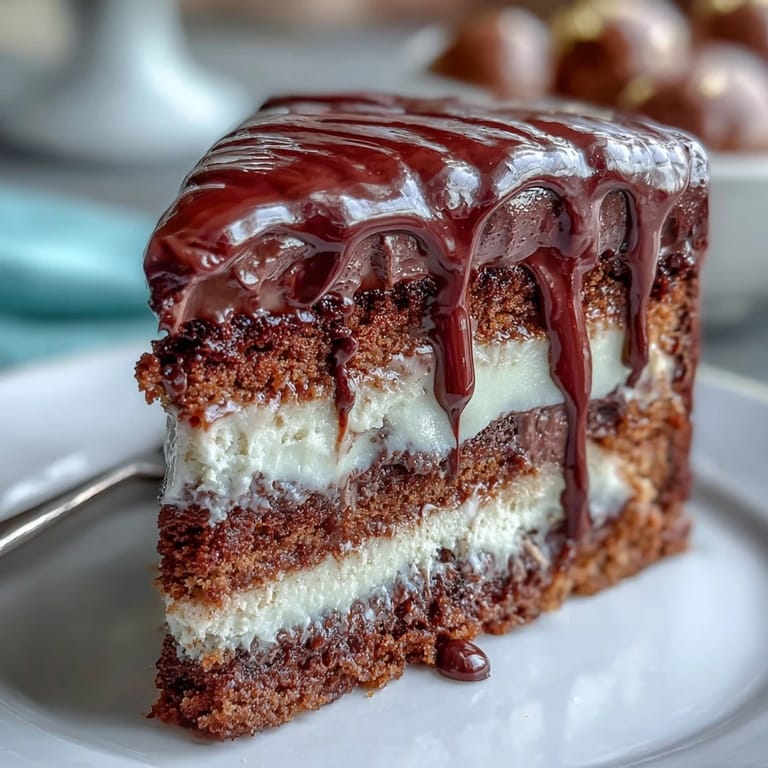
 My friend texted me at midnight asking if I could make her graduation cake, and something about the urgency made me say yes immediately. I'd never attempted a three-layer cake with a drip before, but watching her walk across that stage felt like it deserved something more than store-bought. The vanilla sponge turned golden under the oven light, and by the time I piped those white chocolate drips, I realized I wasn't just baking—I was celebrating someone's entire future on a plate.
I'll never forget my cousin's face when she saw this cake at her graduation brunch; she literally sat down at the table without speaking for a full five seconds. Everyone wanted to know if it was from a fancy bakery, and I loved admitting I'd made it at home the night before, flour still in my hair. That's when I realized this recipe doesn't just taste good—it carries the weight of someone believing you showed up for them.
Ingredients
- All-purpose flour (2 ½ cups): Sifting it prevents dense pockets and gives the sponge that cloud-like crumb; I learned this after one particularly heavy cake disaster.
- Baking powder (2 ½ tsp): This is your lift, so don't skip it or swap it for baking soda unless you're okay with a flatter result.
- Unsalted butter (1 cup for cake, 1 cup for buttercream): Room temperature means it creams properly; cold butter won't incorporate air, and your cake stays dense.
- Granulated sugar (2 cups): Beating it with butter for three full minutes sounds tedious until you see the pale, fluffy mixture that makes magic happen.
- Eggs (4 large): Room temperature eggs integrate smoothly; straight from the fridge, they seize up and create lumps.
- Pure vanilla extract (1 tbsp plus 1 tsp): Don't use imitation here—the white chocolate deserves the real deal, and your guests will taste the difference.
- Whole milk (1 cup): Room temperature milk prevents shocking the batter and keeps everything in harmony.
- Powdered sugar (4 cups, sifted): Sifting removes lumps before mixing; otherwise you're beating them apart, which overworks the buttercream.
- White chocolate (6 oz melted for buttercream, 6 oz for drip): Good quality matters here because white chocolate burns easily and turns grainy if overheated.
- Heavy cream (2-3 tbsp for buttercream, ¼ cup for drip): This adjusts consistency and keeps the buttercream silky; don't pour it all in at once or you'll over-thin it.
- Edible gold spray or luster powder: This is purely for celebration, but those shimmering balloons on top tell everyone this cake is special.
Tired of Takeout? 🥡
Get 10 meals you can make faster than delivery arrives. Seriously.
One email. No spam. Unsubscribe anytime.
Instructions
- Prep Your Pans:
- Grease three 8-inch round pans thoroughly, then line the bottoms with parchment circles; this prevents sticking and makes turning out the cakes effortless. A tiny bit of butter on the pan helps the parchment stay put while you line it.
- Make Your Dry Mixture:
- Whisk together flour, baking powder, and salt in a medium bowl, breaking up any lumps. This distributes the leavening evenly so your cake rises consistently.
- Cream Butter and Sugar:
- Beat room-temperature butter and sugar together for about three minutes until the mixture looks pale, fluffy, and almost mousse-like. You're incorporating air here, which gives the cake its tender texture.
- Add Eggs and Flavor:
- Add eggs one at a time, beating well after each addition so they emulsify properly. Once all eggs are in, add vanilla extract and mix until combined.
- Build the Batter Gently:
- On low speed, alternate adding the dry mixture and milk, starting and ending with flour. This order prevents overmixing and keeps gluten development minimal, which means a softer crumb.
- Bake Until Golden:
- Divide batter evenly among pans and smooth the tops. Bake at 350°F for 30 to 35 minutes until a toothpick comes out clean and the edges just pull away from the pan.
- Cool with Patience:
- Let cakes rest in pans for 10 minutes to set slightly, then turn out onto wire racks to cool completely. Warm cakes are fragile and crumble when frosted.
- Make Silky Buttercream:
- Beat softened butter until smooth, then gradually add sifted powdered sugar. Pour in cooled white chocolate, vanilla, salt, and heavy cream, beating until light and fluffy.
- Assemble with Care:
- Level cooled cakes if uneven, then layer them with buttercream, applying a thin crumb coat first and chilling 30 minutes. This seals in crumbs so your final coat looks pristine.
- Create the Drip:
- Heat cream until steaming, pour over chopped white chocolate, wait one minute, then stir until glossy and smooth. Let it cool to room temperature so it flows down the cake sides without running everywhere.
- Drip Like You Mean It:
- Using a spoon or squeeze bottle, let white chocolate cascade down the cake's top edge and sides, filling the center as you go. This is where the cake transforms from pretty to stunning.
- Decorate Your Balloons:
- Spray crispy pearls or malt balls with edible gold and let them dry completely. Secure them on toothpicks or cake wires and arrange in a festive cluster on top.
- Chill and Serve:
- Refrigerate the finished cake until serving time, then bring to room temperature before slicing for the best flavor and texture.
 Pin It
 There's something about watching someone's eyes light up when they see a cake you made with your own hands—especially one that marks a huge moment in their life. This isn't just cake; it's proof that you believed enough in them to spend an evening doing something intricate and joyful.
Why Room Temperature Matters More Than You'd Think
I used to think room temperature was a suggestion until I compared two batches made minutes apart, one with cold ingredients and one with warm ones. The difference was shocking—one crumb was dense and tight, the other tender and open. Now I pull everything out of the fridge 30 minutes before starting, and it's become my secret weapon for a cake that feels like it melts on your tongue.
The White Chocolate Drip is Easier Than It Looks
The drip intimidated me the first time because it looks so polished and intentional, but the truth is simpler than you'd imagine. Once that ganache is the right temperature—cool but still pourable—you're basically letting gravity do the work while you guide it with a spoon. Even if your drips aren't perfectly even, they look artistic and organic, which is way more interesting than machine-made perfection.
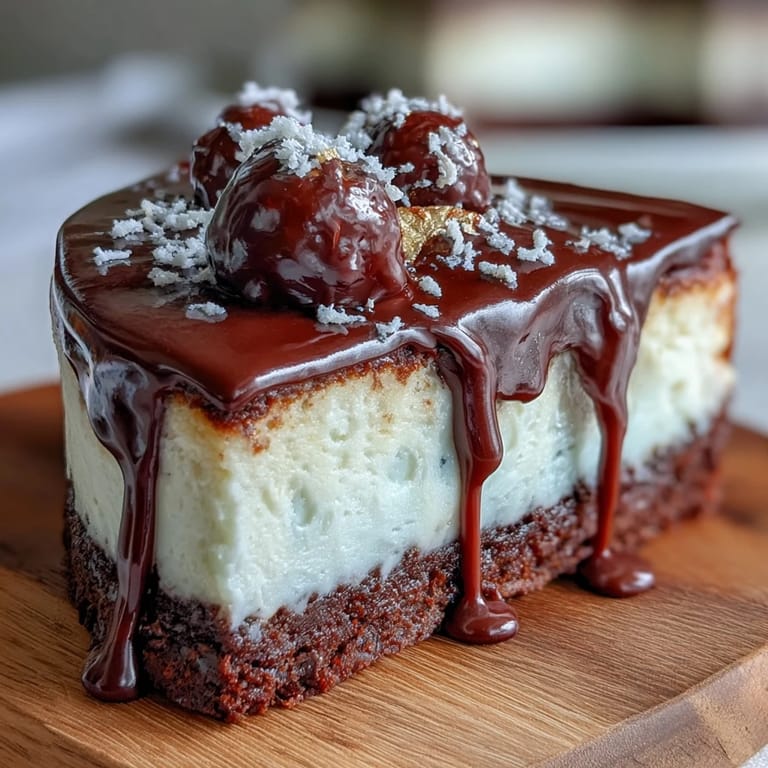
Gold Balloons Are Your Celebration Statement
Those little gold-dusted decorations took me five minutes to make but transformed the entire cake's energy. They catch the light, they sparkle, and they immediately signal to everyone that this cake is for something special. You can use anything that feels celebratory to you—gold-wrapped chocolates, edible glitter, or even fresh flowers if you want to go a different direction.
- Spray the pearls or malt balls in a well-ventilated area and let them dry completely before handling.
- You can make the balloon decorations up to a day ahead and store them in an airtight container.
- If edible gold spray isn't available, brush the pearls with edible luster powder mixed with a tiny bit of vodka or clear extract for adhesion.
 Pin It
 Make this cake for someone worth celebrating, and watch how something you built with your hands becomes a memory they hold forever. That's the real magic here.
Recipe FAQs
- → How can I ensure the vanilla sponge stays moist?
Use room temperature ingredients and avoid overmixing the batter. Baking just until a toothpick comes out clean helps retain moisture for a tender crumb.
- → What’s the best way to achieve a smooth white chocolate buttercream?
Beat butter until creamy before gradually adding sifted powdered sugar and melted white chocolate. Adding heavy cream in small amounts helps reach a silky consistency.
- → How do I create the white chocolate drip effect?
Warm heavy cream until simmering, pour over chopped white chocolate, and stir until smooth. Cool slightly before dripping around cake edges using a spoon or squeeze bottle.
- → Can I substitute the gold balloons decoration?
Yes, edible gold spray can be applied to chocolate candies or crispy pearls as an alternative festive decoration.
- → What’s the best way to store this cake?
Refrigerate for up to three days, then bring to room temperature before serving to maintain texture and flavor.